How To Use AirPods Like Never Before Everything About Apple AirPods
How to use AirPods Like Pro Lets Know About Great AirPods
 |
| Wireless Apple Airpods |
So you’ve treated yourself to AirPods, Apple’s first-ever earphones based on Bluetooth technology that use its in-house designed W1 silicon for some cool smarts.
Though intuitive to use right out of the box thanks to W1-enabled features like zero-configuration pairing, automatic ear detection, gestures and seamless switching between devices, there’s more to AirPods than meets the eye. In this tutorial, you’ll learn everything there’s to know about setting up, using and customizing your AirPods like a pro.
About Apple AirPods
Before we begin—and this is important—just because AirPods rely on Apple’s wireless chip, called W1, doesn’t mean they only work with Apple devices. On the contrary, AirPods act as standard Bluetooth earphones when used with non-Apple hardware.
In addition to giving AirPods five-hour battery life, a better Bluetooth connection and improved AAC-encoded sound, the custom-designed W1 chip is responsible for other features that can only be used on Apple devices, like Siri integration, one-tap setup, automatic iCloud pairing, seamless switching between devices and other perks.
 |
| AirPods-W1-chips |
Optical sensors and motion accelerometers inside AirPods work with the W1 chip to control the audio and engage the microphone, giving you the ability to use one or both AirPods. The sensors also let AirPods play sound as soon as they’re in your ears and engage the beam-forming microphones.
 |
| AirPods-With-Siri |
Inside of each AirPod is a voice accelerometer that recognizes when you’re speaking. Used in conjunction with a pair of beam-forming microphones, this technology allows AirPods to filter out external noise and focus on the sound of your voice when you make or receive phone calls, talk to Siri and more.
When you set AirPods up with one iOS device or Mac computer, they are automatically set up with your other iOS 10, macOS Sierra and watchOS 3 devices as long as they’re signed in to iCloud with the same Apple ID account.
tvOS does not yet support iCloud-based AirPods pairing.
AirPods system requirements
Advanced AirPods features are fully supported on iPhone, iPad and iPod touch models with iOS 10.2 or later, Apple Watch models with watchOS 3.0 or later and Mac models with macOS Sierra 10.12.0 or later.
On non-Apple devices, AirPods behave like standard Bluetooth headphones.
An iCloud account is required for one-tap setup across all your Apple devices. iCloud-based pairing is unavailable on Apple TV, older Mac models and non-Apple devices.
The following Apple device models are fully supported by AirPods:
iPhone Model List Supported AirPods :-
- iPhone 5
- iPhone 5c
- iPhone 5s
- iPhone SE
- iPhone 6
- iPhone 6 Plus
- iPhone 6s
- iPhone 6s Plus
- iPhone 7
- iPhone 7 Plus
iPad Model List Supported AirPods :-
- iPad mini 2
- iPad Air
- iPad Air 2
- iPad mini 3
- iPad mini 4
- iPad Pro (9.7-inch)
- iPad Pro (12.9-inch)
- iPod touch
- iPod touch 6th generation
Mac Model List Supported AirPods :-
- Newer Mac models with Handoff support
Apple Watch Model List Supported AirPods :-
- 38mm Case
- 42mm Case
AirPods do not work with iPod shuffle and iPad classic digital music players because those devices lack Bluetooth hardware.
How to pair AirPods With Apple Products
Thanks to the magic of Apple’s W1 chip, the traditional Bluetooth pairing is a thing of the past—yourAirPods are ready to set up when you first open the charging case lid.
You will use your iPhone to set up AirPods for the first time. Your iCloud account will be used to sync pairing information so AirPods can be used with other Apple devices without the need for any additional pairing.
This auto-pairing feature works on compatible iPhone, iPad and iPod touch models with iOS 10.2 or later, Apple Watch models with watchOS 3 or later and Mac models with macOS Sierra or later.
While AirPods act like regular Bluetooth earphones on any Bluetooth-enabled host device, zero-configuration pairing via iCloud isn’t possible on the following hardware:
- Apple TV
- Older Macs with legacy Bluetooth chips that lack Handoff support
- Windows PCs
- Android devices
- Other non-Apple hardware
In other words, you must manually pair AirPods with Apple TV, older Macs and any non-Apple hardware because those devices lack software support to automatically retrieve pairing information from iCloud.
How To Pair AirPods with iPhone or iPad
Follow the steps below to use auto-pairing:
1) Press the iPhone’s Home button to unlock it and get to your Home screen. Be sure that Bluetooth is enabled by swiping up from the bottom of the screen to access Control Center, then tap the Bluetooth icon.
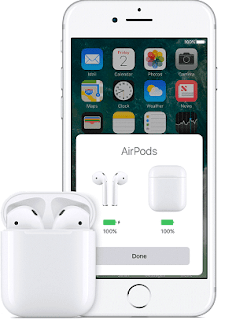
2) Open the case with AirPods inside and hold it approximately two inches (six centimeters) away from iPhone.
3) A setup animation should play on iPhone.
 |
| Pair AirPods with iPhone |
5) Tap Done to finish setting up your AirPods.
If your iPhone is signed in to iCloud, pairing information is sent to other iOS, macOS and watchOS devices that use the same iCloud account. This lets you simply select AirPods in Control Center on iOS and watchOS, or from the Volume menu bar item on macOS, to start using them.
If AirPods are already paired with your iPhone and you want to pair them with another iPhone, put them in the charging case, then flip the lid open and you’ll see the AirPods card pop up on the other iPhone. Now tap Connect, then press and hold the button on the back of the case to connect AirPods to this iPhone.
How To Pair AirPods with Mac
You can also set up AirPods on your Mac and have iCloud push pairing information to your iPhone, iPad, iPod touch and Apple Watch. Unfortunately, macOS does not support the quick-connect AirPods card that pops up on iOS as soon as the charging case is opened near your iPhone.
To pair your AirPods on macOS, do the following:
- Put AirPods in their charging case.
- Open the lid, but don’t remove AirPods yet.
- Press and hold the circular setup button on the back near the bottom of the charging case until the status light between your AirPods at the top of the case starts rhythmically blinking white.
- On Mac, go to System Preferences → Bluetooth.
- Wait a few seconds until macOS detects your AirPods, then click Pair next to their name in the Devices list.
How To Pair AirPods with Apple Watch
Once paired with your iPhone, AirPods automatically pair with your Apple Watch running watchOS 3. To pair them manually with Apple Watch, follow the instructions below.
- Put your AirPods in the charging case.
- Open the lid, but don’t remove AirPods yet.
- Press and hold the circular setup button on the back near the bottom of the charging case until the status light between your AirPods at the top of the case starts rhythmically blinking white.
- Launch Settings on Apple Watch, tap Bluetooth and select your AirPods when they appear on the list of nearby Bluetooth devices.
After device status changes from “Pairing” to “Paired,” AirPods are ready to use.
How To Pair AirPods with Apple TV
Apple TV does not support AirPods pairing via iCloud so you must manually connect them to the device. The process of pairing AirPods manually with Apple TV is the same as that for connecting standard Bluetooth headphones or keyboards to the set-top box.
- Put your AirPods in the charging case.
- Open the lid, but don’t remove AirPods yet.
- Press and hold the circular setup button on the back near the bottom of the charging case until the status light between your AirPods at the top of the case starts rhythmically blinking white. This means that AirPods are in Bluetooth discovery mode.
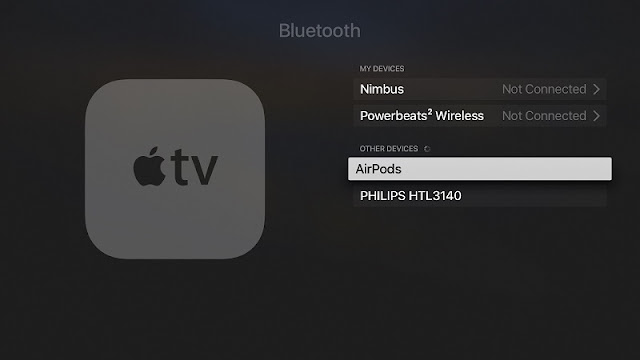
- On your fourth-generation Apple TV go to Settings → Remotes and Devices → Bluetooth. On older Apple TV models, go to Settings → General → Bluetooth.
- Click your AirPods underneath the Other Devices heading.
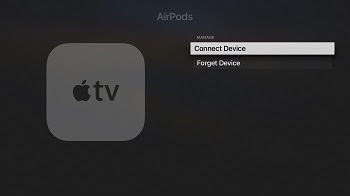
- Click Connect Device to start the pairing process.
 |
| How To Pair AirPods with Apple TV |
 |
| Pair AirPods with Apple TV |
When pairing completes, you can start using AirPods on your Apple TV.
How To Pair/Connect AirPods with Android Or non-Apple devices
To pair your AirPods manually with a Windows PC, Android smartphone or tablet or other non-Apple hardware with Bluetooth support, follow the steps below.
1) Put your AirPods in the charging case.
2) Open the lid, but don’t remove AirPods yet.
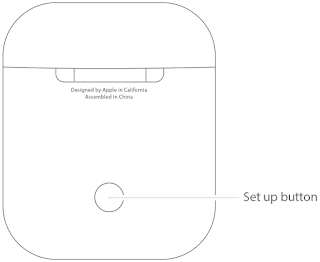
3) Press and hold the circular setup button on the back near the bottom of the charging case until the status light between your AirPods at the top of the case starts rhythmically blinking white.
 |
| how to connect airpods with non apple products |
4) On your host non-Apple device, engage in the Bluetooth pairing process like you normally would and follow any onscreen prompts to finish setting up your AirPods.
How To Pair AirPods with older Macs
On older Mac models, AirPods must be paired manually like other Bluetooth devices.
1) Put your AirPods in the charging case.
2) Open the lid, but don’t remove AirPods yet.
3) Press and hold the circular setup button on the back near the bottom of the charging case until the status light between your AirPods at the top of the case starts rhythmically blinking white.
4) Launch System Preferences → Bluetooth, select your AirPods in the Devices list, then click the Pair button.
How to unpair/disconnect AirPods
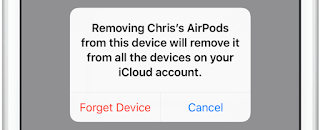
Be advised that unpairing AirPods from your iPhone, Apple Watch or Mac automatically removes them from all your other iPhone, iPad, iPod touch, Mac and Apple Watch devices that are signed in to the same iCloud account.
It may take a few seconds for AirPods to disconnect from all your iCloud devices.
They remain paired with other devices that don’t support iCloud pairing (i.e. Apple TVs, older Mac models, Windows PCs and Android smartphones and tablets) until manually unpaired.
Disconnect AirPods manually from those devices in their Bluetooth settings menu.
Unpairing AirPods from iPhone or iPad
1) Tap Settings → Bluetooth on your iPhone.
2) Hit “i” next to your AirPods, then tap Forget This Device.
 |
| how to disconnect airpods on iPhone |
A warning message appears saying that removing AirPods from this device will automatically remove them from all your other iCloud-signed devices.
3) Confirm the action by tapping Forget This Device in the popup menu.
If you don’t see AirPods in the Devices list, make sure that Bluetooth is on.
Unpairing AirPods from your iPad only unpairs them from your iPad and you can repair them to iPad at any time.
Disconnect/Unpairing AirPods from Mac
1) Open System Preferences → Bluetooth.
2) Click the X to the right of the AirPods name, or right-click your AirPods in the Devices list, then choose Remove from the popup menu.
3) Confirm the action by clicking Remove.
Tip: Alternatively, hold down the Option (⌥) key while clicking the Bluetooth icon in your Mac’s menu bar, then select your AirPods and choose Remove from the menu.
Unpairing AirPods from Mac only unpairs them from Mac and you can repair at any time.
Disconnect/Unpairing AirPods from Apple Watch
1) On your watch, launch Settings → Bluetooth.
2) Tap “i” next to AirPods name in the list.
3) Tap Forget Device.
Unpairing AirPods from iPhone automatically unpairs them from Apple Watch.
Disconnect/Unpairing AirPods from Apple TV
1) Go to Settings → Remotes and Devices → Bluetooth on your fourth-generation Apple TV or Settings → General → Bluetooth on earlier Apple TV models.
2) Click your AirPods in the list, then choose Forget Device.
If AirPods are paired with this Apple TV, a dialog pops up warning you that you’re about to disconnect them. Confirm the operating by choosing Forget Device from the prompt.
Diconnect/Unpairing AirPods from Android/non-Apple devices
AirPods act like ordinary Bluetooth earphones when used with non-Apple hardware, meaning they can be unpaired just as easily as, say, Bluetooth keyboards and mice.
Read the manual that came with your non-Apple device for specific unpairing steps.
How to charge Apple AirPods
AirPods deliver five hours of listening time or two hours of talk time on one charge. Their run time can be extended to up to 24 hours of listening time or up to eleven hours of talk time via the included charging case that holds multiple, full charges.
Charging AirPods
To charge your AirPods, simply put them in the charging case.
AirPods automatically shut down and charge whenever they’re in the case. A short 15-minute session in the charging case equals three hours listening time or 1+ hour of talk time.
Charging AirPods charging case
To charge the charging case itself, plug the included Lightning to USB cable into the Lightning connector on the case, then connect the other end of the cable into any USB-powered device, including your iPhone’s five-watt power adapter.
To accelerate charging, connect the case to the twelve-watt USB power adapter that came with your iPad. You can charge the case with or without your AirPods inside. If the case is plugged while AirPods are inside, both the case and your AirPods will charge simultaneously.
Deciphering charging case status light states
The status light sits between the spaces for AirPods at the top of the charging case. The LED status light indicates the charge status of AirPods when they’re in the case. If not, the LED shows the charge status of your charging case.
 |
| charging apple airpods |
Here’s how to interpret/work the status light:
- Green—Fully charged.
- Orange—Not fully charged.
- Amber—Less than one full charge remains.
- Flashing white—AirPods are ready to set up with your devices.
How Apple tested AirPods batteries
While battery life depends on a variety of factors, including device settings, usage and more, Apple’s tests were based on preproduction AirPod units, charging case and software paired with preproduction iPhone 7 units and iOS software.
For music playback tests, Apple ran a playlist comprised of 358 unique 256-Kbps AAC-encoded audio tracks purchased from iTunes Store until the first AirPod stopped playback. As for talk time, testing consisted of full AirPods battery discharge with a cellular phone call until the first AirPod stopped playing call audio.
To test performance of the charging case battery in terms of music playback and talk time, Apple charged the fully drained AirPods in the case for 30 minutes. Next, audio playback or a cellular phone call was routed to AirPods and left running until one of them stopped playing music or call audio. The cycle was repeated until both AirPods and the charging case were fully discharged.
Lastly, the 15-minute charge test was conducted by draining both AirPods before charging them for fifteen minutes. The music playlist or a cellular phone call was then played through AirPods until the first AirPod stopped playback.
In all tests, volume was set to fifty percent.
How to check AirPods charge levels
Check the status of juice in AirPods and their charging case in four ways:
- Charging case—The case’s status light roughly indicates AirPods charge level.
- Batteries widget—Quick overview of Bluetooth accessories charge levels.
- Volume menu bar item—See AirPods and charging case power levels via Mac.
- Siri—Siri can tell you the status of AirPods battery charge.
- Apple Watch—Get the current AirPods charge levels via your wrist.
Checking AirPods charge with charging case
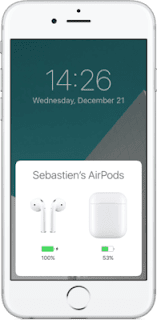
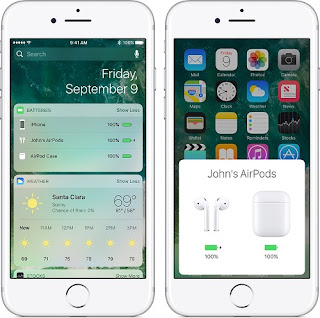
If your AirPods are in the charging case, simply open the lid and hold the case close to your iPhone. After a few seconds, iOS 10 puts up a sheet displaying the charge status of both your AirPods and the charging case.
 |
| charging Airpods with case |
Checking AirPods charge with Batteries widget
Alternatively, use the stock Batteries widget to check the current level of juice in any Bluetooth audio accessory connected to your iOS device, AirPods included. If it’s not already enabled, you must add it first to your active widgets.
1) Invoke Notification Center on your iPhone by pulling down from the screen top, then swipe right to get to the widgets screen. Scroll all the way to the bottom, then tap Edit.
2) Tap the plus icon next to Batteries underneath the More Widgets section.
3) Tap Done to finish making changes to your widgets.
 |
| AirPods charge with Batteries widget |
To check power levels of your AirPods and their charging case using the Batteries widget, simply swipe right on Lock screen or inside Notification Center, or get to your widgets by swiping to Home screen 0.
While Batteries widget shows you the charge status of your AirPods, the status of the case’s battery appears only when at least one AirPod is in the charging case.
Checking AirPods charge with Mac’s volume control
1) Open the lid of the charging case or simply take your AirPods out of the case.
2) Click the Volume icon in your Mac’s menu bar.
3) Look for your AirPods and charging case under My Devices.
Checking AirPods charge with Siri
You can ask Siri about the current state of juice in your AirPods. To check the battery, ask Siri “How’s the battery on my AirPods?”
Checking AirPods charge via Apple Watch
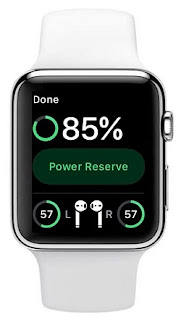
If you’re an Apple Watch wearer, swipe up from your watch face and tap the battery percentage indicator in Control Center to see the current AirPods power levels.
How to use Apple AirPods
Each AirPod has either “L” or “R” printed on it to denote their orientation. Place left AirPod in your left ear and right AirPod in your right ear. The optical sensor inside each AirPod enable it to play sound as soon as it’s in your ear.
You will hear a tone when AirPods are ready to be used.
Taking either AirPod out of an ear is the equivalent of the Pause command: whatever song, podcasts, audiobook or other audio content was playing gets paused until you put it back in your ear. Playback is stopped when both AirPods are removed from your ears.
If you use a single AirPod, the W1 chip takes advantage of a mono mixdown which lets you hear both sides of any stereo audio.
Using Siri with AirPods
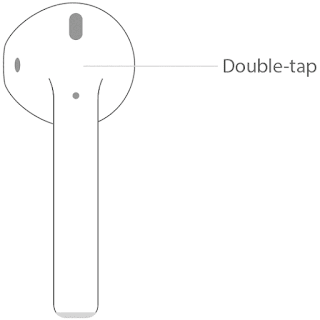
On either AirPod, double-tap above the stem to activate Siri on iOS or macOS. You will still need to pull iPhone out of your pocket to glean useful information from any Siri search results that cannot be spoken back to, such as image searches.
Because AirPods lack any physical buttons, you will need to ask Siri to turn the volume up or down, skip to the next or previous song and do other things on your behalf in terms of adjusting audio playback.
Here are a few choice Siri commands for controlling audio playback:
- “Play” or “Pause music”
- “Play SONG NAME” or “Play PODCAST NAME”
- “Play my Favorites playlist”
- “Skip back”, “skip forward” or “skip to the next song”
- “Skip back/forward x seconds/minutes/hours”
- “Lower/raise volume x percent”
These commands won’t work if iPhone cannot establish a network connection because unlike Voice Control, Siri requires an Internet connection even for basic playback commands. Until Apple’s personal assistant is able to handle back-and-forth conversation as well as services like Google Assistant or Amazon Alexa, asking Siri to do things like locate nearby restaurants will require tapping around search results.
How To Make and Receive calls with AirPods
On either AirPod, double-tap above the stem to answer an incoming call. During the call, you can double-tap again to hang up or switch to another incoming call.
If you’d like AirPods to announce who’s calling you without having to reach or your iPhone, go to Settings → Phone and enable one of the following options:
- Always—your iPhone will always announce the caller.
- Headphones & Car—The caller will be named only for calls received when you’re in the car or wearing AirPods or other Bluetooth headphones.
- Headphones Only—iPhone will announce who’s calling you only if a call is received when wearing AirPods or other Bluetooth audio accessory.
To place a call hands-free, double-tap either AirPod to activate Siri and simply ask her to call one of your contacts.
Switching AirPods between devices
AirPods connect automatically with iPhone, iPad, iPod touch, Mac and Apple Watch devices via iCloud. On Apple TV, AirPods must be manually paired.
AirPods are simultaneously connected to the above devices via iCloud, meaning you don’t need to disconnect them manually from one device every time you want to use them on another device.
To switch AirPods, just select them on any of the aforementioned devices.
- Select AirPods in Control Center on iPhone, iPad, iPod touch or Apple Watch.
- Click AirPods from your Mac’s Volume menu bar.
- Switch to AirPods on Apple TV by choosing them from Bluetooth settings menu.
On Apple TV, older Macs and non-Apple devices like Windows PCs and Android smartphones and tablets, you will need to manually connect AirPods in Bluetooth settings menu before you can use them.
Switching to AirPods from iPhone and iPad
Swipe up from the bottom of the screen on iPhone, iPad or iPod touch to bring up Control Center. Swipe left to get to the Now Playing card with your media playback controls, then tap the downward-pointed arrow at the bottom and select AirPods from the popup menu.
Alternatively, switch to AirPods by tapping them in Settings → Bluetooth.
The audio output menu is available directly within certain apps, like Music. Output returns to iPhone if AirPods move out Bluetooth’s range of 33 feet, or ten meters.
Switching to AirPods from Apple Watch
If you set up your AirPods with iPhone, they’re already ready to use with your Apple Watch. Swipe up from the bottom of the watch face to open Control Center, tap the AirPlays icon that looks like a concentric circle with a triangle at the bottom, then select your AirPods from the menu.
If a call comes in through Apple Watch while AirPods are connected and playing audio, you’ll notice a bespoke AirPods button in place of the usual green Answer button indicating the call will be relayed through AirPods rather than through Apple Watch speaker.
Switching to AirPods from Mac
Click the Volume icon in your Mac’s menu bar, select AirPods and choose Connect from the sub-menu to start listening. Apps like iTunes may provide their own controls for selecting a desired audio playback device.
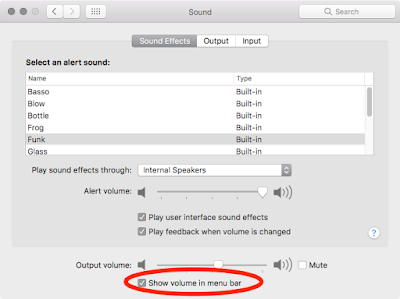
Tip: If you don’t see the volume menu bar icon, go to System Preferences → Sound and tick the box next to “Show volume in menu bar,” as shown above.
On legacy Macs that don’t have Bluetooth chipsets which are required for Handoff, go to System Preferences → Bluetooth, right click your AirPods in the list, then select Connect in the popup menu.
It should now be possible to switch to AirPods from the Volume menu bar.
Switching to AirPods from Apple TV
On fourth-generation Apple TV, go to Settings → Remotes and Devices → Bluetooth (for earlier Apple TV models, go to Settings → General → Bluetooth), click your AirPods in the My Devices list, then choose Connect Device.
Apple TV will now play audio through your AirPods.
Tip: If for one reason or another AirPods don’t appear in the list even though they’re paired with your device, check if “Not Connected” appears next to their name in Settings → Bluetooth on iOS or System Preferences → Bluetooth on macOS.
Tap your AirPods in the list on iOS, or right-click them on macOS and select Connect to re-establish wireless connection, which should make AirPods re-appear in the audio output menu and elsewhere in the system.
How to adjust AirPods settings
Thanks to Apple’s W1 chip, AirPods can be customized to your liking. You are permitted to rename them, choose a shortcut for when you double-tap either earphone, enable or disable automatic ear detection, as well as adjust which of the two beam-forming microphones picks up your voice when you talk.
Naming AirPods
By default, Apple uses your first name to name your AirPods (i.e. “Christian’s AirPods”). If you don’t like this naming scheme and would rather set a custom name for your AirPods, you can do so by following these steps:
1) Go to Settings → Bluetooth on your iOS device.
2) Locate your AirPods underneath the My Devices section, then tap the “i” icon.
3) Tap Name.
4) Type a new name you’d like for your AirPods.
5) Go back to the previous screen to save the changes.
You cannot rename AirPods unless they’re paired with your device.
 |
| naming Airpods |
Tip: to rename AirPods on Mac, go to System Preferences → Bluetooth, right-click your AirPods in the Bluetooth devices list, choose Rename from the popup menu, type a new name and click Rename.
Changing what double-tap shortcut does
Built-in motion accelerometers determine when you double-tap either AirPod, allowing you to activate Siri without taking iPhone out of your pocket. If you’d rather AirPods start or stop audio playback when double-tapped, do the following:
1) Go to Settings → Bluetooth on your iOS device.
2) Tap on of the commands provided underneath the Double-Tap on AirPods section to change the shortcut to one of the following functions:
- Siri—Default Siri shortcut.
- Play/Pause—Double-tapping either AirPod plays or pauses audio.
- Off—Nothing happens when you double-tap either AirPod.
Tip: Leave the double-tap shortcut assigned to Siri to be able to adjust the volume, change the song, make a call, get directions and more, without taking iPhone out of your pocket.
On non-Apple devices, double-tapping either AirPod produces a Play/Pause command.
Disabling automatic ear detection
Optical sensors inside each AirPods work with the W1 chip to automatically enable AirPods as soon as you put them in your ears and stop audio when you take them out. If you’d rather turn your AirPods on and off manually, disable automatic ear detection.
1) Go to Settings → Bluetooth on your iOS device.
2) Slide the Automatic Ear Detection switch to the OFF position.
If Automatic Ear Detection is on and you’re not wearing your AirPods, audio plays through your host device’s speakers. With Automatic Ear Detection disabled, all audio plays through your AirPods whether or not you’re wearing them.
Selecting which AirPods microphone is used
Motion accelerometers in AirPods work with the W1 chip to automatically engage one of the beam-forming microphones for voice calls and Siri commands. Should you find this feature lacking or simply prefer telling your AirPods to use either left or right beam-forming microphone, do the following:
1) Go to Settings → Bluetooth on your iOS device.
2) Tap Microphone at the screen bottom.
3) Now choose your preferred setting:
- Automatically Switch AirPods—AirPods will use motion accelerometers to automatically switch to the microphone that’s getting the best input.
- Always Left AirPod—Microphone in your left AirPod is always used.
- Always Right AirPod—Microphone in your right AirPod is always used.
If you change microphone settings to use either the left or right AirPod, that AirPod becomes the microphone even if you remove it from your ear or put it back in the charging case. If you’re using only one AirPod, that AirPod will be the microphone.
And that’s all, folks!
Covering Post :)
So,that's the long and all about the Apple AirPods.Those among you who own AirPods will hopefully learn a few tricks for getting the most from your purchase. Don’t own AirPods or not interested in them at all?





No comments: